Introduction to Algorithms in Java:
The Sieve of Eratosthenes
Basic Concepts
What is an algorithm?
An algorithm is simply a step-by-step procedure for solving a problem or producing a desired result.
We frequently talk about algorithms in Mathematics, but they are not necessarily mathematical;
on the other hand, algorithms generally have a certain formality and structure, of the kind that we often see in mathematical and scientific work.
In general, a good algorithm has the following characteristics:
- Clear and complete initial conditions (including conditions which identify problems for which the algorithm is or isn't applicable).
- A clear and complete sequence of steps to follow, to solve the problem.
- Clear and complete stopping conditions.
A note on stopping conditions: These tell us when we're done — but they might also tell us when the algorithm has reached a "dead end".
Now, just because an algorithm reaches a dead end in some cases, doesn't mean the algorithm won't work in other cases;
however, if the description of the algorithm doesn't include conditions which identify the dead ends we might reach, then the algorithm is incomplete.
Also, if we reach a dead end, that doesn't necessarily mean that the problem cannot be solved at all — only that it can't be solved with this algorithm.
Finally, a good algorithm should be very unambiguous.
For example, we probably wouldn't place much confidence in an algorithm that included the instruction, "Step 3: Now subtract 18 from the total … or maybe 42 … you decide."
Return to top
What do algorithms have to do with computers?
Computers can perform amazing feats of calculation and memory — but without our help they are almost totally useless, when it comes to solving even the most basic problems.
We give them this help, by "teaching" them the steps of algorithms, to solve the problems we're interested in.
How do we teach computers? By programming them.
For the most part, computer programming consists of writing unambiguous, step-by-step procedures for the computer to follow, in a language that can be understood by the computer.
In other words, we might say that computer programming is all about algorithms.
Return to top
The Sieve of Eratosthenes
Who was Eratosthenes?
Eratosthenes of Cyrene was a scholar and librarian (he was the third librarian at Alexandria) who lived from 276 BCE to 194 BCE.
He was generally considered to be an excellent all-round scholar, but not the first of his peers in any individual field.
Nonetheless, many of his accomplishments were impressive in their time (for example, he made surprisingly accurate measurements of the circumference and tilt of the Earth), and his most famous innovation, the "Sieve of Eratosthenes", is an important technique in number theory even today.
Return to top
The sieve and prime numbers
A prime number is a positive integer which has exactly two distinct positive integral divisors: itself and 1.
Note that by this definition, 1 cannot not a prime number, since it has only one positive integral divisor (itself).
We can prove that there is no limit to the number of primes, but they slowly become more sparse as they get higher in value.
Eratosthenes invented a very simple and effective algorithm for finding prime numbers, based on the realization that once we find a prime number, we have found an infinite number of non-prime numbers that correspond to that prime — namely, all of the integral multiples of the prime, greater than itself.
So, to find all of the primes between 2 and some upper limit, we would do the following:
The Sieve of Eratosthenes
- Write down all of the positive integers, from 2 to the upper limit, in order.
-
Beginning with the number 2, proceed as follows:
- If the current number is crossed out, ignore it.
-
If it is not crossed out, do the following:
- Start with twice the current number;
- Cross out every integral multiple of the current number (besides the current number itself) which appears on the list.
- If you are at the end of the list, stop; otherwise, go on to the next higher number in the list.
- Done: every number not crossed out is a prime.
The simplicity of this algorithm is a key benefit in its use and implementation —
so much so that there is still no better method for enumerating the smaller primes (those less than 1,000,000 or so).
For finding large primes (currently, the largest known has 7,816,230 digits, when written in decimal form), there are techniques that are more efficient, but the mathematical foundations of these are much more advanced.
Return to top
Implementing the Sieve in Java
Exercise #1: Creating a Java application project in NetBeans
During the rest of the session, we will turn the Sieve of Eratosthenes into a Java program.
As a first step, let's create a NetBeans project, in which we will build our program.
At the same time, we will build a Java class — which will end up as our program, but it won't do much of anything yet.
In NetBeans, select New Project… from the File menu, to open the New Project wizard:

Select General from the list of categories, and Java Application from the list of projects.
Then, press the Next button, to go to the following screen:
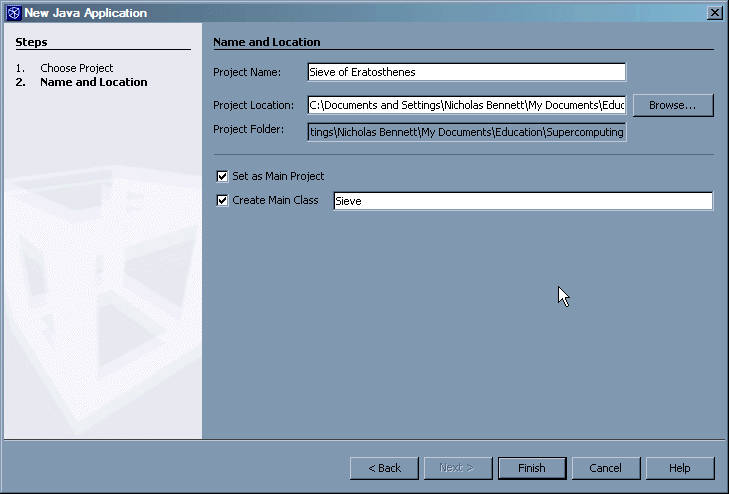
Follow these steps to complete the New Java Application screen:
- For Project Name, type "Sieve of Eratosthenes" (don't worry about spelling or case for this one — the name you type is the name NetBeans will use when displaying the project in its workspace, but is has little to do with the compilation and execution of your program).
-
The value provided by default in Project Location is probably fine;
but if you want to be able to copy your work to a floppy or USB drive, it might be easier if you specify a directory (by clicking the Browse… button, and navigating from there) that will be easily found later.
(The Desktop is pretty good for this purpose.)
In any event, you will want to write this value down for later use.
- Make sure that Set as Main Project is checked.
- Make sure that Create Main Class is checked, and type "Sieve" for the class name (this time, spelling and case are very important).
- Click the Finish button.
Now, you should see a new NetBeans project, with the source file for the class you specified (in step #4) open and ready for editing.
(Don't worry if your NetBeans screen isn't laid out in exactly the same way: as long as you see your new project on the left, and the Sieve.java file open on the right, you are doing fine.)
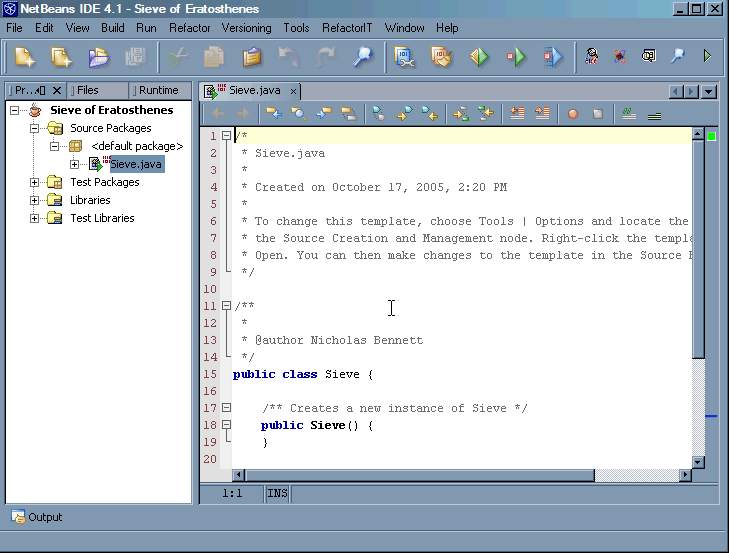
We could have created this class by hand, without much difficulty.
However, NetBeans, like virtually all Java development environments, makes some tasks a little easier (and a few tasks a lot easier), so we'll take advantage of it.
Here are some things to notice about this code:
-
The Java class for our program is
Sieve; similarly, the file in which we define the class is Sieve.java.
It is very important that these two match — not just in name (except for the .java file extension), but also in case;
otherwise, the Java "executive" (the software responsible for loading and running programs written in Java) will not be able to locate our program, to run it.
-
The
Sieve class contains a method called main.
Every Java application class (i.e. the main class of a standalone Java program) must contain this method, declared in the same way (more about this later).
-
The
Sieve class contains a constructor; this is the code that begins with public Sieve().
A constructor is used for creating individual instances based on the class definition.
Even though constructors are a fundamental feature of Java (and most object-oriented languages), we won't be covering them today;
for now, we can ignore this constructor.
-
As it stands, the code compiles and runs cleanly (even though it doesn't really do anything when it runs);
we can check this by selecting Run Main Project from the Run menu (if the code has been modified, this will also cause the code to be recompiled before it is run).
In general, it is a good practice to write code in such a way that you can compile and test often — even before the code does everything it is supposed to do.
Similarly, when changing existing code, make and test small changes — rather than making a large number of changes, and only then trying to compile and test, and finding out that there are several errors in the code.
Now that we've got a place to write Java code, we're going to change gears and talk about something else: "pseudocode".
Return to top
Turning an algorithm into pseudocode
As discussed above, every computer program is essentially an algorithm — but algorithms are not necessarily computer programs.
Each computer language requires that the steps of an algorithm be written in a very specific form, which is usually unique to that computer language.
However, since most languages share fundamental concepts, these specific forms are often not all that different, conceptually speaking.
For this and other reasons, it is often very useful to write an algorithm in an intermediate form, called "pseudocode".
There is no formal specification of the syntax and grammar of pseudocode;
however, a pseudocode description of an algorithm should do the following:
- It should reduce even further — and entirely eliminate, if possible — any ambiguity in the algorithm.
- It should not rely on language constructs specific to any one programming language.
- It should employ a limited number of constructs for conditional logic and iteration (many programming languages have multiple specialized flow control statements — but since pseudocode should not rely on these, it is best to use very basic forms).
- For algorithms which do not proceed in a straightforward linear sequence, the pseudocode should use visual cues to make clearer the flow of the algorithm.
Our previous articulation of the Sieve of Eratosthenes is pretty close to pseudocode as it is — but maybe we can make it even a bit clearer.
At the same time, since we intend to implement the algorithm in a computer, we will include steps which take that into account;
in particular, we will include steps for displaying the prime numbers we found.
(Of course, just as there are many ways to express yourself in English, Spanish, Diné Bizaad, and other written and spoken "natural" languages, there are many ways to express an algorithm in pseudocode — and many ways to express it in computer languages.
So, the pseudocode below is one way of expressing the Sieve of Eratosthenes.)
The Sieve of Eratosthenes
-
Initialize
- Create a set of boolean (true/false) flags, corresponding to the integers from 2 to upper limit, in order.
- Set position to 2.
-
While position is less than or equal to upper limit:
- Set the flag corresponding to position to the value false.
- Increment position by 1.
-
Find primes
- Set position to 2.
-
While position is less than or equal to the square root of upper limit:
-
If the flag corresponding to position has the value false:
- Set multiple to twice the value of position.
-
While multiple is less than or equal to upper limit:
- Set the flag corresponding to multiple to the value true.
- Increment multiple by position.
- Increment position by 1.
-
Display primes
- Set position to 2.
-
While position is less than or equal to upper limit:
-
If the flag corresponding to position is not true:
- Increment position by 1.
In the above pseudocode, the text in italics delimits sections of logically related high-level operations, and the indentation indicates the grouping of lower-level operations within those at higher-levels.
The text in bold refers to named symbols (i.e. "variables") which may hold different literal values at different times.
Return to top
Setting the scope: What will our program do?
We can implement the Sieve of Eratosthenes in Java in all sorts of ways.
For example, we could use a text-mode display, or a fancy GUI;
we could do it all in a single Java method, or in multiple methods;
we could use a single class, or multiple classes;
we could specify the upper limit in our code, or let the user specify it at runtime; etc.
All of the above decisions (and more) are part of what we call the "scope" of a programming project (not to be confused with the scope of a method or variable, discussed below):
what features will be included, and what features will be excluded.
For now, we'll assume the following for our scope:
-
Most importantly, of course, our program will find all of the prime numbers from 2 up to some upper limit.
-
It will use a single class, with multiple methods.
(Every Java application has a
main method;
our application should include additional methods for the top-level sections in the pseudocode.)
-
It will allow the user specify the upper limit, as a command line parameter to the Java program.
(Does our pseudocode include the necessary operations to do this?)
- When our program finishes, it will display the prime numbers in a simple text-based fashion.
Return to top
Exercise #2: Declaring new methods
In Java (and some other object-oriented programming languages), a "method" is a collection of code within a class, more or less self-contained, which is intended to perform a specific task.
A method is declared with a "signature", which consists (primarily) of the following:
- the name of the method;
- the accessibility (
public, private, or protected) of the method, which controls whether the method can be seen from outside the class;
- the scope of the method (
static or unspecified), which controls whether the method is associated with the entire class as a whole, or with instances of the class;
- the return type of the method, which describes the type of value returned as a result by the method;
- the number and types of the parameters passed to the method.
If we look at the main method of our Sieve class, we see that it is declared public (it can be seen and invoked from code running outside of the Sieve class — even outside of our project); with static scope (it is associated with the entire class, and not instances of the class — it can even be called before any instances of the class have been created); with a return type of void (which means that it doesn't return a result at all); with the name "main"; and with String[] (an array of String objects) as the only parameter.
In fact, every Java standalone application must include at least one class with a main method, with exactly this same signature. (Of course, there are many other kinds of classes, which don't require a main method.)
This is necessary, to allow the Java executive to know where our program starts; the main method is the starting point of every Java standalone program.
Now, let's write three more methods — one for each of the top-level tasks in our pseudocode.
Initially, these methods won't do anything (i.e. they will be "skeletons"), but our class will compile and run cleanly when we're done defining them.
Assume the following, while writing these methods:
- The accessibility and scope modifiers are written before the return type of a method, which is in turn written before the name of the method.
- The parameters to the method follow the name of the method, in parentheses; if there are no parameters, empty parentheses are used.
- Following the parameters to the method is the block of statements which make up the method body; these must be enclosed in curly braces.
-
Java classes, methods, and variables cannot have spaces in their names; however, two of the three tasks we defined (Find primes and Display primes) have spaces in their names.
Thus, we must remove these spaces when we convert these pseudocode task names into Java method names.
-
By convention, Java class names begin with an uppercase letter, while variable and method names begin with a lowercase letter.
In some cases (e.g. the
main method), this goes beyond convention, to requirement.
Also, it is perfectly acceptable to have a class, method, or variable name consisting of multiple words, with the spaces between the words removed;
in such cases, the convention is to start each successive word after the first with an uppercase letter.
-
The
main method is declared with public accessibility;
as mentioned above, this level of visibility and accessibility is required, to allow the Java executive to see and invoke the main method.
However, our new methods don't need to be accessible from outside the Sieve class: they will only be called by main.
Thus, these methods (and the two variables declared in the class) can be declared private.
-
The
main method is declared with static scope;
this means that the method can be invoked when the class is first loaded, and before any instances of the class are created.
The simplest way to make sure that our methods can be called by the main method is to declare the new methods with static scope, as well.
-
For now, the only method besides
main which should include any parameters is the method corresponding to the Initialize task.
Since our program scope includes allowing the user to specify the upper limit via a command line parameter, and since we need that upper limit in the Initialize task, we will have to get access to the command line parameters in the corresponding method somehow.
Fortunately, the command line parameters are readily available to us: they are contained in the array of String objects passed to the main method, and referred to that method as args.
The simplest way to write the method for the Initialize task, so that it accepts this same information, is to specify the exact same parameters for this method as are specified for the main method.
-
Finally, while we know that the
main method will be called automatically by the Java executive, our new methods won't get called unless we include the code to do so.
The simplest way to do this is to write statements which call the new methods from the main method.
(Remember: method calls must include any necessary parameters, enclosed in parentheses; if no parameters are required, we still need to include empty parentheses in the method call.)
Incorporating the above points, we could write the initial method declaration for the Find primes task thusly:
Code skeleton for Find Primes task
private static void findPrimes() {
}
Go ahead and add method skeletons for the Initialize, Find primes, and Display primes tasks to your code.
When you are done, you should have something like the following (for compactness, we have left out the comments that NetBeans added to the code automatically):
Skeleton code for the Sieve of Eratosthenes
public class Sieve {
public Sieve() {
}
public static void main(String[] args) {
initialize(args);
findPrimes();
displayPrimes();
}
private static void initialize(String[] args) {
}
private static void findPrimes() {
}
private static void displayPrimes() {
}
}
Check (using Run Main Project from the Run menu) to make sure that your code still compiles and executes without error.
Return to top
Exercise #3: Declaring class variables
In general, a Java class contains the definitions of the variables which represent the attributes of the class (and/or its instances), and the methods which represent the operations of the class (which usually manipulate the class variables, as well).
We have started with the second item (methods), but now we need to backtrack and do something with the first (variables).
In our pseudocode, there are many references to named symbols, which will probably become variables in our Java program.
If we examine the logic of the pseudocode carefully, we can see that the symbols upper limit and flags are the only ones which need to be visible to all of our methods.
These symbols are good candidates for inclusion as class variables.
Other symbols (e.g. position and multiple) will become variables which are used by each of our new methods, but each method will use these variables as necessary, without checking to see what the other methods have done with them; for example, each of the three tasks in our pseudocode resets and updates the value of position for its own purposes.
Thus, these variables are better handled by declaring them within the methods themselves (which we will do later).
Go ahead and add variable declarations (corresponding to upper limit and flags in the pseudocode) to the Sieve class, keeping the following points in mind:
- Declarations of class variables must be located within the class, but outside any class methods.
- By convention, declarations of class variables are placed at the beginning of the class, before the declaration of any constructors and methods.
-
Class variables are declared with accessibility and scope modifiers, as well as a type.
Similar to the case for methods, the modifiers come first, then the type, then the name of the variable.
-
Variables may be assigned an initial value, at the same time that they are declared.
In this case, assume that the variable corresponding to the upper limit will have an initial (default) value of 1000; in other words, if the user doesn't specify an upper limit at runtime, our program will find the prime numbers from 2 to 1000.
-
Because our class variables don't need to be visible outside the class, they should be declared
private; also, since the methods using these variables are declared static, the simplest way for the variables to be available to the methods is to declare the variables static, as well.
-
Java has a variety of numeric types, with different value ranges and levels of precision.
For our purposes, the
int type will serve for the variable corresponding to upper limit.
-
For variables that represent true or false values, the appropriate type is
boolean.
-
If we want to declare a variable that will be actually be an array of some type, we use empty square brackets — either after the type, or after the variable name, in the variable declaration — to declare the array.
(Note that this declares a variable for the array, but it does not actually construct an array of the desired size; we'll cover that later.)
When you are done, you should have something like the following:
Skeleton code, with class variables, for the Sieve of Eratosthenes
public class Sieve {
private static int upperLimit = 1000;
private static boolean[] flags;
public Sieve() {
}
public static void main(String[] args) {
initialize(args);
findPrimes();
displayPrimes();
}
private static void initialize(String[] args) {
}
private static void findPrimes() {
}
private static void displayPrimes() {
}
}
Again, make sure that your code still compiles and executes without error; it is a good idea to do this after each task throughout the session.
Return to top
Exercise #4: Using pseudocode as comments in Java
One way to begin writing a program, when we are starting with pseudocode, is to include the pseudocode as comments, using it as a guide for writing the actual code.
The pseudocode shown earlier is on each of your computers, in a rich-text document (located on the Desktop) called Sieve Pseudocode.rtf.
Copy and paste the text from this document into the methods in your code, as comments.
(Make sure to use comment delimiters, or the uncommented text will produce Java compiler errors.)
As you do this, add any additional comments that you think might be helpful.
When you are done, you should have something like the following:
Skeleton code, with pseudocode comments, for the Sieve of Eratosthenes
public class Sieve {
private static int upperLimit = 1000;
private static boolean[] flags;
public Sieve() {
}
public static void main(String[] args) {
initialize(args);
findPrimes();
displayPrimes();
}
private static void initialize(String[] args) {
}
private static void findPrimes() {
}
private static void displayPrimes() {
}
}
Return to top
Exercise #5: The initialize() method
The first thing our initialize method must do is read the upper limit from the command line parameters.
When loading and running a Java application, the Java executive reads any text on the command line, after the name of the program class, and builds an array of String objects from that text (if there are numbers, they are still treated as text).
It is this array which is passed to the main method — and which our main method is passing to the initialize method.
In our program, there will be only one piece of information passed as a command line parameter: the upper limit of the range in which we will look for prime numbers.
Therefore, this value (if provided by the user at all) will be at the index (position) 0 of the array containing the command line parameters.
(In Java — and many other languages — all arrays begin at index 0.)
In Java notation, with an array called args, we will find this value at args[0].
But how will we know if the user provided any information at all?
If we try to read args[0], but there is nothing in the array at all, what will happen?
In fact, Java does not allow us to read an array element which is outside the limits of the array.
For example, an array with 2 elements will have a value at index 0 and index 1; if we reference index 2 of the array, that will produce an error.
So, back to the previous question: how do we know what the limits are of an array?
Fortunately, Java provides an easy way to find out how many elements are in an array: the length property.
In our program, we can examine the value of of args.length to see how many command line parameters were provided;
if that length isn't greater than or equal to one, then we know that no command line parameters were provided.
In Java, the way that we test conditions, and take action accordingly (e.g. test to see whether a command line parameter was provided, and if so, set the upper limit), is with the if statement:
if statement
if (condition) {
statements
}
If we want to take some action if the condition (which must be enclosed in parentheses) is true, and another action if it is false, we can use an if-else statement:
if-else statement
if (condition) {
statements
} else {
statements
}
Earlier, we noted that command line parameters, even if they are numbers, are placed into an array of String objects.
However, we need this as an int value.
Fortunately, we have an easy way to convert between String and int values: Integer.parseInt(stringValue) returns an int value (assuming stringValue contains text which represents a number).
So, the first task in this exercise is to write the Java code (in the initialize method) which will check for command line parameters, and if there is at least one, converts the first from String to int, and assigns the result to upperLimit.
In doing this, place the code in the appropriate position with respect to the pseudocode (you may need to change the comment delimiters, to keep the pseudocode commented out, but to avoid commenting out your new code).
When you are complete, you should have an initialize method that looks something like the following:
Partially finished
initialize method: reading the command line
private static void initialize(String[] args) {
if (args.length > 0) {
upperLimit = Integer.parseInt(args[0]);
}
}
The next task in the exercise is to construct (i.e. set aside the space for) the boolean array, flags.
In Java, we create arrays and complex objects (variables based on class definitions) with the new operator.
For example, new boolean[100] creates and returns a reference to an array of boolean values, with 100 elements (index 0-99).
Modify your initialize method, to include the code which creates an array of boolean values, with a maximum array index of upperLimit; the reference returned when this array is created should be assigned to the flags variable.
Your code should resemble the following:
Partially finished
initialize method: creating the
flags array
private static void initialize(String[] args) {
if (args.length > 0) {
upperLimit = Integer.parseInt(args[0]);
}
flags = new boolean[upperLimit + 1];
}
Note that, by making the size of the array upperLimit + 1, the highest index of the array will be upperLimit — which is precisely what we wanted.
Also note that we are wasting a little bit of space in our array: the boolean values at index 0 and index 1 will never get used (since we start our algorithm at a position of 2).
That's ok, in this case: we will accept some waste, in exchange for simplicity.
In the next part of our pseudocode, we perform an iteration.
This is a kind of loop, generally used to iterate over the elements of an array or list, or as a simple counter.
There are a number of ways to do iteration in Java, but the best fit in this case is probably the for loop:
for statement
for (initializer; condition; incrementor) {
statements
}
This is equivalent to the following (which looks a lot like our pseudocode):
while statement, in place of
for statement
initializer
while (condition) {
statements
incrementor
}
In both cases, the logic is identical:
- The initializer statement is executed.
-
The condition is tested; if it is true:
- The statements are executed.
- The incrementor statement is executed.
- Execution returns to step #2
Compare this to the pseudocode in our initialize method.
- What is the initializer?
- What is the condition?
- What is the incrementor?
- What are the statements to be executed in each iteration?
Write the for statement which implements the remaining pseudocode logic in the initialize method; insert this code as before, adjusting the pseudocode as necessary.
One thing to remember in doing so is that the initializer statement will consist of both a variable declaration and assignment.
Your initialize method should now look something like this (pseudocode omitted for compactness):
Completed
initialize method
private static void initialize(String[] args) {
if (args.length > 0) {
upperLimit = Integer.parseInt(args[0]);
}
flags = new boolean[upperLimit + 1];
for (int position = 0; position <= upperLimit; position++) {
flags[position] = false;
}
}
As you might have started to suspect, the value of the pseudocode comments starts to diminish, as we complete the translation of pseudocode to real code.
If you want, you can (carefully!) remove the pseudocode from your initialize method, after you test to make sure your code compiles cleanly.
Return to top
Exercise #6: The findPrimes() method
By now, you've already used most of the techniques you will need for the rest of the session.
With each task, you'll probably need less and less explanation before beginning.
However, if you find yourself falling behind, or needing clarification, please do not hesitate to ask the instructor.
For the first task in this exercise, start by examining the pseudocode in the comments of the findPrimes method.
Can you see another iterative loop, which uses position to iterate over elements of the list of flags?
(It might be unclear at first, since we really have one iterative loop nested inside another.
In such cases, it can be helpful to focus on the the "counter", or iterator — the variable which is being initialized at the start, and incremented at the end of each iteration.)
One question you may be asking is related to the line of the pseudocode which says "While position is less than or equal to the square root of upper limit".
How do we find the square root of a number?
Well, just as the Integer class provided a method called parseInt, which let us convert a String to an int, there is a class called Math which has a number of useful methods for mathematical calculations — including a method called sqrt.
Specifically, Math.sqrt(numericValue) returns a value which is the square root of numericValue.
Go ahead and write a for statement which implements the "outer" loop of the findPrimes method (i.e. the one using position as an iterator).
Again, focus on the questions asked in exercise 5:
- What is the initializer?
- What is the condition?
- What is the incrementor?
- What are the statements to be executed in each iteration?
This time, however, don't try to write Java code for the statements; leave these as pseudocode comments inside the for loop you write.
Your findPrimes method should now resemble this:
Partially finished
findPrimes method: adding the outer loop
private static void findPrimes() {
for (int position = 2; position <= Math.sqrt(upperLimit); position++) {
}
}
Let's continue with the next part of the pseudocode, "If the flag corresponding to position has the value false".
In translating this to Java, we should note an important point:
in languages which have a built-in boolean type, like Java, we don't need to compare a variable of that type to true or false, to see if that variable is true or false.
Instead, we can just use the value of the variable instead.
For example, we don't need to write if (booleanValue == true) {statements}, in order to execute statements when booleanValue is true;
instead, we can simply write if (booleanValue) {statements}.
The same is true when testing for a false value: if (!booleanValue) {statements} works just as well as (and is recommended over) if (booleanValue == false) {statements} or if (booleanValue != true) {statements}.
So let's move on to the next task: write the Java if statement that corresponds to the pseudocode "If the flag corresponding to position has the value false", and include the nested pseudocode as comments inside the if statement.
Now, your findPrimes method should resemble this:
Partially finished
findPrimes method: testing the
flags array
private static void findPrimes() {
for (int position = 2; position <= Math.sqrt(upperLimit); position++) {
if (!flags[position]) {
}
}
}
We're almost done with this method; in fact, the remaining pseudocode looks an awful lot like that of the initialize method.
It should be very simple to translate the pseudocode inside our new if statement into a Java for statement;
however, for practice, let's write it as a while statement.
(Remember, we described these two statements above, and showed how any for statement can be converted to a while statement;
in many cases, the for statement has the advantage of being more compact, but we'll do this one as a while.)
Your completed findPrimes statement should now look something like this (again, the pseudocode is omitted):
Completed
findPrimes method
private static void findPrimes() {
for (int position = 2; position <= Math.sqrt(upperLimit); position++) {
if (!flags[position]) {
int multiple = position * 2;
while (multiple <= upperLimit) {
flags[multiple] = true;
multiple += position;
}
}
}
}
Return to top
Exercise #7: The displayPrimes() method
Compared to findPrimes, this method is pretty simple: we need to iterate over the flags array (starting at array index 2, as before), and display all of the index values that aren't marked true (i.e. the prime numbers) in the array.
The only question that remains is this: how do we display these values?
Earlier, when we agreed on what our program would and wouldn't do, we decided that it would display the primes in a very simple text-based fashion; for now, we'll skip fancy graphical output.
So, how do we output simple text from a Java program?
Well, just as we can run programs from a command prompt (in Windows, Linux, Unix — even Macintosh OS X 10.x, though it's not as obvious how it is done on the Mac), we can output text to a command window, as well.
Programs that run in this mode, without graphical input or output, are often called "console mode" programs.
When sending output to the console, you are writing to a device referred to as "standard output".
In Java, you write to standard output with the System.out object, generally using one or more of the print, println, and printf methods.
In our case, let's use the print method, which sends output to the console, without automatically putting each item on a new line.
When compiling System.out.print(), the Java compiler checks to see if we are concatenating multiple values inside the parentheses (e.g. System.out.print(x + y)), and if any one of those values is a String; if so, it converts everything in the concatenation to a String.
This makes it easy to display combinations of text and numeric values at the same time.
Go ahead and complete the displayPrimes method now, using System.out.print() to display the primes, and putting a comma and a space after each value (so that we can easily read the numbers).
In doing this, you might find it useful to copy the for statement from the initialize method, and the if statement from the findPrimes method.
The completed method (without pseudocode) should resemble the following:
Completed
displayPrimes method
private static void displayPrimes() {
for (int position = 2; position <= upperLimit; position++) {
if (!flags[position]) {
System.out.print(position + ", ");
}
}
}
You should be done with your code now.
Review the entire Sieve class; it should look, more or less, like this:
Completed
Sieve class
public class Sieve {
private static int upperLimit = 1000;
private static boolean[] flags;
public Sieve() {
}
public static void main(String[] args) {
initialize(args);
findPrimes();
displayPrimes();
}
private static void initialize(String[] args) {
if (args.length > 0) {
upperLimit = Integer.parseInt(args[0]);
}
flags = new boolean[upperLimit + 1];
for (int position = 0; position <= upperLimit; position++) {
flags[position] = false;
}
}
private static void findPrimes() {
for (int position = 2; position <= Math.sqrt(upperLimit); position++) {
if (!flags[position]) {
int multiple = position * 2;
while (multiple <= upperLimit) {
flags[multiple] = true;
multiple += position;
}
}
}
}
private static void displayPrimes() {
for (int position = 2; position <= upperLimit; position++) {
if (!flags[position]) {
System.out.print(position + ", ");
}
}
}
}
Now, when you select Run Main Project from the Run menu, you should actually see a display of prime numbers, in the NetBeans output window; scroll to the right to review the entire list.
Do you see any non-primes in this list?
If so, then there is an error in your code; verify the logic of your findPrimes and displayPrimes methods.

Return to top
Exercise #8: Specifying different upper limits in NetBeans
We have written our code so that a user can specify an upper limit at runtime, using the command line.
In a few minutes, we will try doing just that; for the moment, let's see how NetBeans lets us specify command line parameters — even though we don't see a command prompt in NetBeans.
In the Projects, on the left-hand side of the NetBeans workspace, right-click on the name of your project (probably "Sieve of Eratosthenes"), and select Properties from the context menu that pops up.
In the Project Properties window that appears, select Run from the Categories list:
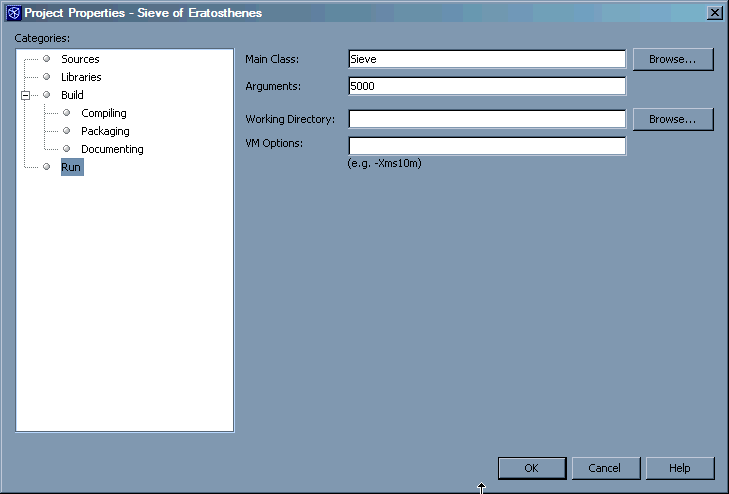
The Arguments field (probably blank, in your case) contains the values that NetBeans will pass to Java applications as command line parameters.
Type a number in this field, other than the default value of 1000 (the screen shot shows a value of 5000; you should have no problem going up to a few million, but if you use a value which is too high, you will receive an "out of memory" error when you try running the program), and click the OK button.
Select Run Main Project from the Run menu, and verify that the program is returning prime numbers up to the new upper limit.
Return to top
Exercise #9: Running from the command prompt
Now, you're going to run the Sieve class from a command prompt — typing in the necessary instructions to run the Java executive, instructing it to load the Sieve class, and (optionally) specifying the upper limit in the command line.
However, there's one wrinkle: when you use NetBeans to build a Java application, NetBeans compiles the classes in your project, and copies them (by default) into a .jar archive (of course, like everything else in NetBeans, we could do this manually, but it would be more complicated).
This archive is basically a .zip file, but with a different extension.
One advantage of such an archive is that all of the classes involved in a complex Java application (or applet) can be packaged into a single file, making delivery and installation of that application much easier.
However, when we run a Java application packaged in a .jar archive from a command prompt, we need to tell the Java executive to look in the .jar, to find our program class.
From the Start/All Programs/Accessories menu (or Start/Programs/Accessories, for Windows 2000 systems, or Windows XP systems configured to use the Windows 2000-style interface), select Command Prompt.
You should now see a window like this one (but with a different path in the prompt):
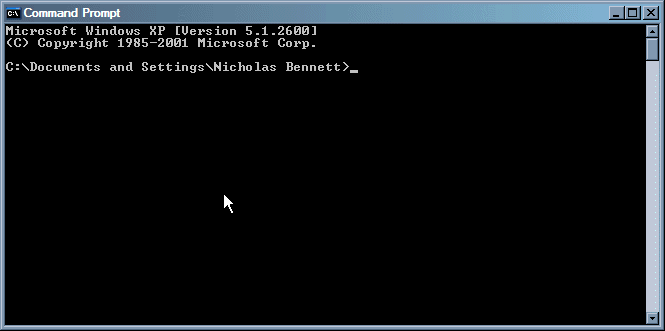
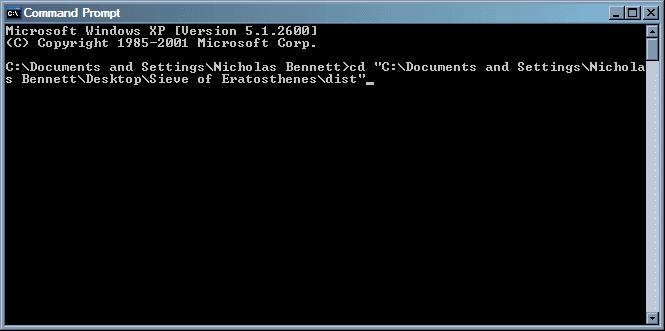
Now, use the cd or chdir command, as necessary, to navigate to the dist directory in your NetBeans project.
One simple way to do this is to open a Windows Explorer window, and navigate to your project directory (remember when we recommended you write this down, earlier?);
then, in Windows Explorer project, open the dist subdirectory in your project;
then, copy the full path of this directory from the address bar at the top of the window;
finally paste this path (enclosing it in double quotes) into a cd command, in the command prompt window:
Once the current directory of the command prompt is the dist directory of your NetBeans project, you are almost ready.
The last step before running your program is to do a dir listing the files (really, just one file) in the directory.
You will see a list that looks something like this:
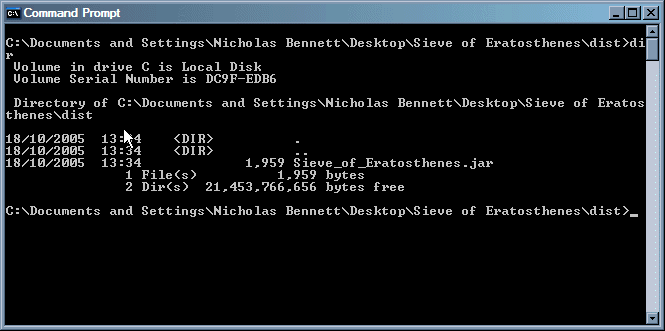
The file that shows up in the listing is the .jar archive created by NetBeans, containing the Sieve class.
Also, since we specified, right at the start, that the Sieve class would be the main class of the project, NetBeans has marked that class as the main class in the archive;
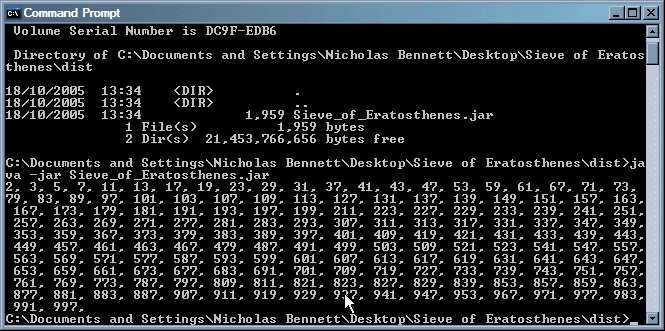
because of this, all we need to do to run our program is tell the Java executive to run the .jar archive itself, by typing the following (if your .jar file has a different name, substitute that name accordingly):
Running the
Sieve (main) class from a
.jar archive
java -jar Sieve_of_Eratosthenes.jar
When you type the above into your command prompt window, and hit Enter, you should see something like the following:
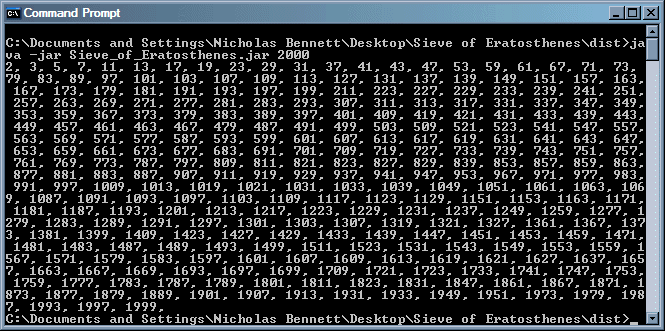
To specify a different upper limit, simply type that at the end of the same command as above:
Running the
Sieve (main) class with a new upper limit
java -jar Sieve_of_Eratosthenes.jar 2000
The above command produces the following output:
Congratulations! If you made it this far, then you have successfully implemented the Sieve of Eratosthenes in Java.
Return to top


